How I Organize My Handbag

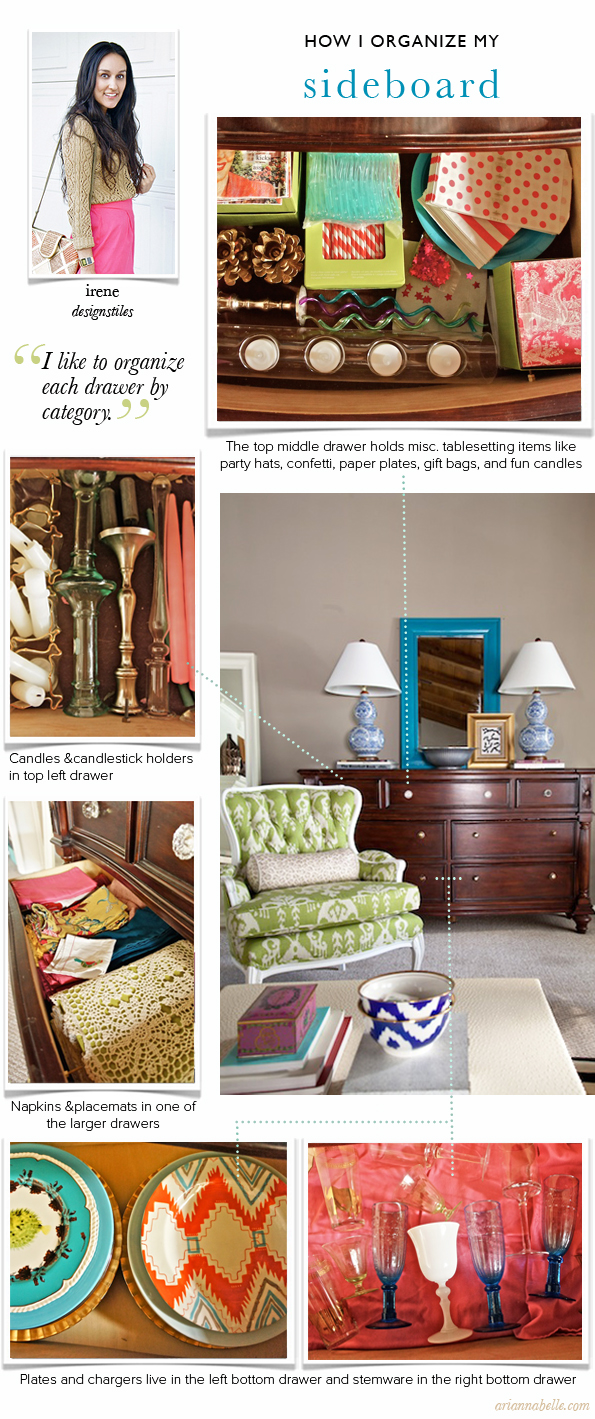
I oftentimes carry a lot of things in my handbag - keys, cell phone, driver's license, credit cards, debit cards, rewards cards, cash, coupons, lists, hair ties, lip balm, lotion, tissues, pens, sunglasses, the list goes on....can you relate?

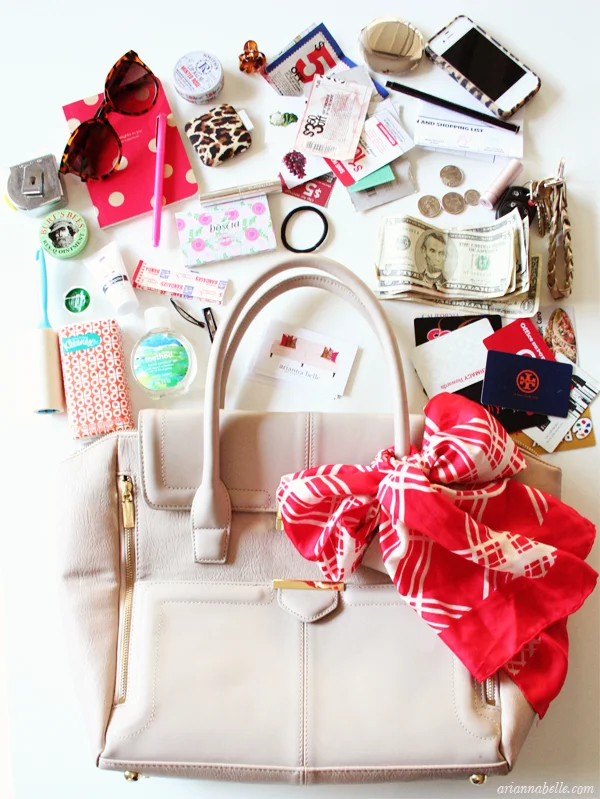
Because most of these items are relatively small, they can easily get lost in a large bag and it's so annoying to have to rummage through to try to find what you're looking for.  What I like to do is group and separate everything into smaller bags, cases and pouches.

For the essentials like money, driver's license, keys, tinted lip balm, and my cell phone, I use a wristlet that easily fits in my bag and I can pull out when I'm making a quick trip and don't really need much else (the one I have is an old style but you can find a similar one here). I use a magic wallet, which is compact enough to fit inside the wristlet, to keep my credit cards, debit cards, and my license, organized. I keep cash and coins in the little interior pockets of the wristlet. I try not to put anything else in there so that there's enough room to also fit my keys if needed.

For all the non-essential cards that I use less frequently but still like to have on hand, like loyalty cards, rewards cards, gift cards, etc., I use a card cubby and sort them all into the little alphabetized dividers.

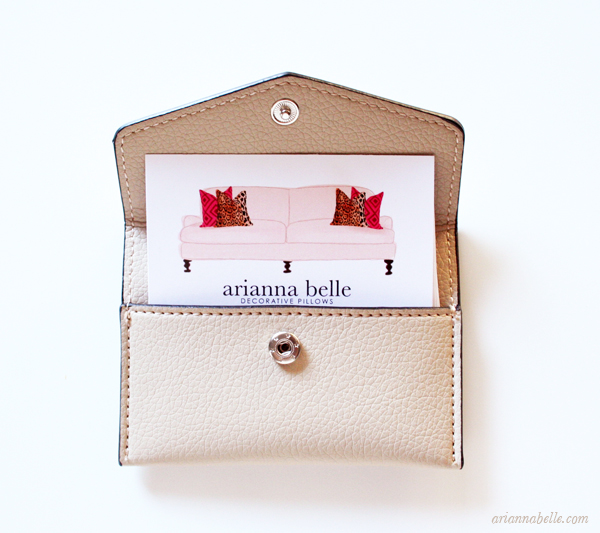
My business cards go into a nice business card case so they don't get dirty or bent.

Coupons go into a small expanding file case. There was a time not too long ago when my husband and I were really penny pinching and to make the most of the money we had, I got into the habit of putting coupons for items we frequently bought or stores we normally shopped at, into an coupon file that I took with me whenever I went shopping. This worked really well and I've continued with this habit.  I no longer find myself at the store saying, "aww I had a coupon for that!" and feeling regretful that I could have saved some money.  I labeled this expanding file with general categories like beauty, craft, grocery, office, etc., which makes it easy to find the relevant coupons when I'm at the checkout counter. I use the space in the front for my shopping list and a pen.

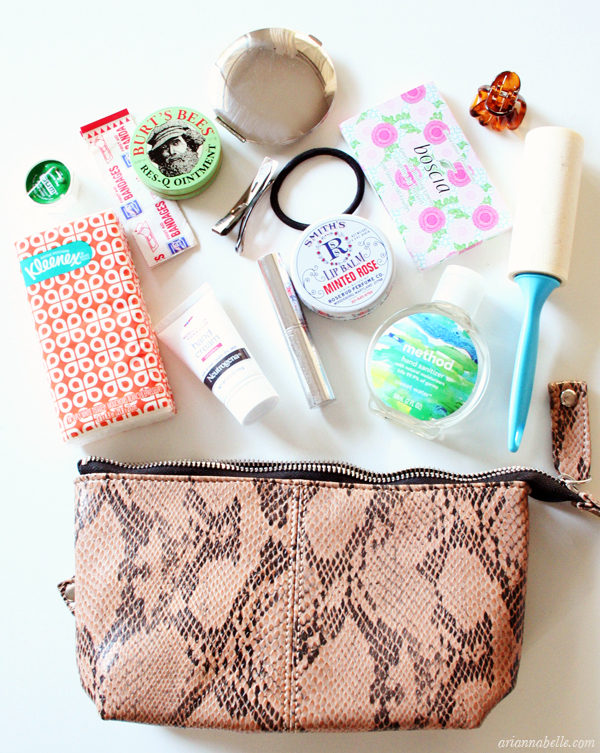
In an accessory pouch that has interior pockets, I keep beauty and personal care items that are nice to have handy like hand cream, hand sanitizer, hair ties & clips, lip color, a mirror, oil blotting sheets, floss, a mini lint roller, tissues, bandages and a multi-use ointment.

My miscellaneous items, like a measuring tape, notebook for jotting down notes and ideas on the go, an extra pen, and a backup battery for my phone, all go into a zippered pouch:

Organizing everything this way makes the contents of my bag much less chaotic and allows me to easily find what I'm looking for when I need it. It also makes it much easier to switch handbags. 

So there you have it, that's how I organize my bag.   The general idea is to group like items together and put them into smaller bags, pouches or cases that will keep the contents organized.  I know everyone has different needs and carries around different things, but I hope this inspired some ideas on how to organize your own bag, if it's not organized already.

*The folks at Office Depot sponsored this post.  All ideas/opinions/thoughts are my own.

My Home Office Pin Board

Though I have a lovely gallery wall in my office, what I face when I'm sitting at my desk are two doors - one which leads to the hallway and I almost always keep open, and the other which leads to our laundry room and I always keep closed since there's another door we use to access that space.

For awhile I kept both doors blank, which made for an uninspiring view from my desk.   I finally realized the door I always keep closed would be a great spot for a cork board. While I love Pinterest and use it almost daily, it's nice to be able to pin on an traditional physical board.  It's a great spot not just for inspiring images, but also for notes, reminders, keepsakes, artwork, and fabric swatches.  Plus a cork board gives me a certain tactile experience I don't get when I'm pinning virtually, and by having it in front of my desk it can serve as something beautiful to glance at throughout the workday to give my eyes a rest from the computer screen.

Before heading to the store, I measured my door so I could easily decide what size cork board would make best use of the space. The 24x36 size was just the right width and height.  Not too big, not too small.

To make it fit seamlessly with the decor of my office, I covered the board in a simple white cotton fabric and gave it the look of nailhead trim by adding super inexpensive thumb tacks along the line of the board's frame. Since my place is a rental, I didn't want to make any holes on the door, so I used command strips to mount the board.

Overall the process was easy and I'm thrilled with the results. Here's how it looks:

ariannabelle-board-600w.jpg

I pinned: a few inspiring images (from my virtual boards) that I had printed on card stock, a magazine pull-out, a lovely art piece my sister made for me with the word 'Love' painted in gold, a few fabrics I'm considering for pillows for the shop, as well as a little printed reminder to myself to drink more water, take my vitamins, and make green juice.

For those of you interested in making a similar board for yourself, here's a list of what I used and a few tips:

Tips:

-Iron your fabric before stapling it to the board

-After you staple the fabric on one side of the board, pull the fabric really tight before stapling the other side.

-When placing the thumb tacks, use your thumb as a spacing guide

-Place the command strips on the frame of the board to help them best adhere to the wall

-The strips come in two different colors - black and white.  Since you may possibly be able to see a little bit of the strips from a side view, get the ones that are closest in color to either your wall color or the color of your fabric.

-Most importantly, have fun pinning to your board!

*The folks at Office Depot sponsored this post.  All ideas/opinions/thoughts are my own.

How Monika Organizes Her Jewels & Perfumes

Today I'm delighted to bring to you a new How I Organize post! Shop owner and lifestyle blogger Monika Hibbs (who just became a mom to a sweet baby boy!), gives us a look at how she beautifully organizes her jewelry and collection of perfumes:

I like to have most of my everyday jewelry in place, ready for me to quickly pick up and go! Having all those jewels organized on my side table along side my perfume is perfect!  The silver tray is from The Cross Design, one of my favorite home décor stores in Yale Town, Vancouver. The Stag Head jewelry holder, which holds my bracelets is from Front & Company in Vancouver. 

For pieces that I only take out for special occasions I like to have them all wrapped up in the boxes they came in. I laugh, because my husband thinks I'm a horder- whereas I like the organization of each piece in it's place! Takes up a little bit more room, but those boxes are just too nice to throw away!

headshot photo by Melissa Skoda, all others by Ellen Ho of Hong Photography

A Beautifully Organized Pantry

In my previous home, I organized my pantry using matching food storage containers from Ikea which I labeled using my P-touch labeler. I loved it because it was practical, streamlined and looked great. When we moved to our current apartment last year, since the containers unfortunately didn't really fit in our new awkward sized narrow cabinets, I decided to give them to my mom who was reorganizing her kitchen at the time.  The plan was to get new containers that better fit our new cabinets and in the interim keep items in their original bags and boxes and/or use whatever (mismatched) containers we had on hand. A year has passed though and I still haven't gotten the new containers.

These photos below from the kitchen of Jen of the Social Home are giving me the inspiration and push I need to get my pantry looking beautiful again.   Jen used matching containers from the dollar store and created her own lovely labels, which she generously offers as downloadable freebies here and here.  She also offers custom labels in her shop The Paper Society.

So pretty, wouldn't you agree?

p.s. Check out her post on how to smudge-proof your labels

A Beautifully Organized Creative Workspace

In love with this creative workspace from the home of Darcy Miller, illustrator and editorial director of Martha Stewart Weddings. It's the chicest craft room I ever did see! It's not only fully stocked with all the supplies you could ever need for any creative project, but it's also beautifully organized.  Everything has a home designated based on frequency of use, so things are accessible and easy to find. With the exception of the art supplies which bring a cheerful rainbow array of color to the space, most everything (the walls, floor, ceiling, furniture, and storage containers) is black, white, and gray. This creates a uniform look and keeps the room from feeling chaotic or overwhelming.

See more here.

Photography by Christopher Sturman 

Living Room Progress

I'm back from my Santa Barbara mini getaway with my husband (see photos of the trip here). We've both been working a lot so it was definitely a fun, relaxing, much needed break.

As promised, I wanted to share with you all my living room progress.  Since the last update here's what I've done:

+Separated the two tables we were using as a coffee table and designated them as side tables

+Moved the chair ottoman to the middle of the room and added a tray so we could use it as a coffee table

+Added pillows to the sofa. I went with two blue velvet, two aga reverse black*, and a petite zig zag french blue lumbar*.

+ Hung the beautiful paintings I had commissioned from Parima Studio

+Purchased a media console. We went with this one from Ikea which was inexpensive (a necessity since this is a short term home) and just the right size. We've customized it by painting the back in a similar color blue as the velvet pillows. We bought doors for it, however not sure if we'll use them or not.  Still deciding... Might just add two bottom drawers to hide the X-Box controls and gadgets and keep the rest as open storage.

+Added an accent table with a scalloped top next to the chair.  It's black and I like how it looks but I'm kinda tempted to paint it another color.  Undecided still.

+Bought three square frames to hang on the wall in a vertical column to the left of the paintings. They're silver but I plan on spray painting them gold to match the mirror above the fireplace.

Overall, here's what the room is currently looking like:

What's up next:

+paint the three frames and hang them

+ add drawers to the media console and style the shelves

+ get another side table lamp

+buy and install cover for tv cords & wires

+find a stylish storage basket or bin for Little Foot's toys

Hopefully these last few things don't take me too long! Stay tuned for more updates!

*I don't have these pillows available in the shop website yet. If you're interested, email shop@ariannabelle.com for a quote.

Organized Baking Cabinet

Hope you all had a very merry Christmas yesterday!

My hubby and I spent a few days before the holiday, baking goodies to give to family and friends. We don't bake all that much and our kitchen storage is very limited so we keep all our baking specific ingredients and supplies separate from items we use more often, in harder to reach upper cabinet shelves, and pull them out as needed a few times a year.  Someday when we have a bigger house, and make the time to bake more often, I'd love to have a whole cabinet dedicated to baking items, beautifully organized like this:

Such a perfect little station! Everything has a spot within the cabinet to make time in the kitchen efficient and enjoyable. Like items are placed together: spices, extracts and flavorings on the bottom; baking powder, baking soda and salt in the middle; and pastry bags and tips up top. White hooks on the inside of the cabinet doors, holding mixer attachments and measuring spoons, take advantage of a frequently untapped storage area.  Risers placed in the back of the the cabinet give shelves multiple levels and make things easily visible. Clear glass jars, canisters and bottles, not only makes it easy to take stock, but also creates a neat and uniformed look, free of visual clutter. Love the labels too! The ones used here are from Paper Source.

Do you like to bake often? Do you have a spot in your kitchen where you keep all your baking items?

image sources: 1, 2, 3, 4

Apartment Updates

I've been sharing peeks into my home on Instagram today, and thought I'd share them on here as well.  I realize it's been awhile since I blogged about changes I've made!

First off, my office is coming together nicely, if I do say so myself. Remember what it looked like when we first moved in? Here's a peek at the progress I've made and what it's looking like now:

Still need to find some more art to fill some of the frames in the gallery wall and get a few more organizational items and accessories here and there. I'll give a full tour once it's all "done"!

I finally made myself some pillows for my living room sofa. It was looking quite bare without anything.  Here's what they look like:

I'll be adding similar ones to the pillow shop soon. You can also email me if you're interested in getting some made for your home.

After months of not DIYing it myself, like I said I would, I finally decided to commission Patricia of Parima Studio to make a colorful piece of art for above my sofa.  She shared with me a close-up of the progress so far:

So excited to see the final product and put it up in the living room!

In my kitchen (which I wish I could gut and completely remodel but I can't because it's a rental), I added a few things to make it prettier:

The tea kettle is a Le Creuset, which was sent to me by the friendly folks at All Modern.   It's in the most beautiful shade of blue and has a little bit of an ombre effect.  I absolutely love it - makes me smile every time I see it!  I also like that it whistles when the water is boiling, an absolute must for someone like me who tends to forget I have something on the stove (bad I know) !

The utensil holder glazed in turquoise inside, is from Etsy shop KarinLorenc. I love supporting fellow small businesses!

The little bowl that holds garlic and shallots is from Anthropologie (though I don't think it's available anymore).

Last but not least, in our bedroom we put up an inexpensive Ikea shelf to serve as a bedside table. We installed one on just one side of the bed to see if we liked it, which we do, so we still need to put up one on the other side.  Having a shelf instead of a regular bedside table allows us to open the drawers we have under the bed. A simple black frame holds of a photo of us on our wedding day (5 yr anniversary coming up pretty soon!) and I replaced our old ugly alarm clock with this pretty one from LL Bean:

ariannabelle-bedsideshelf.png

Well that's all the updates for today.  Be sure to follow along for more later on!

How Kelsey Organizes Her Armoire

This week, participating in the How I Organize series, is interior designer and room stylist, Kelsey of Kelsey Design. She gives us a peek at how she organizes her beautiful bedroom armoire:

I have been in love with French armoires for as long as I can remember. When I saw one on Craigslist, I knew my time had come. It still needs a little TLC and I haven't decided if I'll keep the wood or paint it white. I love when I open the doors to my armoire, I can see everything at a glance- no more opening and closing drawers to find that one piece!

I'll be honest, it is not always easy neatly folding all my pieces, rather than shoving them in a drawer. But, everything is at my fingertips! I can actually remember what all I have. Socks, t-shirts, undies, and flats are piled in baskets. My belts are in an apothecary jar and my scarves are in a clear basket- even your armoire needs a pop of color! I display my statement necklaces on a mirrored tray to stay inspired when picking out my outfits. The rest of my accessories are housed in a chest of mini drawers and my favorites are in a vintage blue candy jar. Vintage candy jars are one of my favorite ways to store favorite accessories- where practical meets pretty! I stack my jeans, pants, and sweaters. They are easy to remove from the stack without the whole pile tumbling down. Like colors are paired together...can you tell I'm in love with pink and red pants?

Dinner Planning

When we were newlyweds, my husband and I struggled on a constant basis with not knowing what to make for dinner each night. He'd come home from school, I'd come home from work, both mentally tired, and one of us would ask "what should we make?", to which the other would reply, "I don't know....ummm...." Finally someone would think of something, and then we'd check to see if we had the ingredients for it and though sometimes we'd luck out, more often than not we'd be missing at least one or two things. We'd then either, scramble up something with what we did have, make a run to the grocery store, or give up and order take out.

Over time we started to get the hang of things. After trying out a few different ways to organize the process we've settled upon this current system (outlined below), which has eliminated excess trips to the grocery store, helped us cut down on food spending, and overall has worked really well for us:

  • We sit down together one day during the week (usually Saturday or Sunday morning after breakfast) and decide on what we'd like to eat each night. If we're having a hard time coming up with ideas, we turn to food websites, blogs, our cookbooks, and/or Pinterest.
  • Using the (free!) Real Simple Dinner Planner (which to take make things convenient, we keep copies of in a transparent pocket adhered to the inside of our pantry door), we write the dishes in the Menu column (furthest left). When deciding on what dinner to slot on what day of the week, we keep in mind which ones rely on more perishable groceries and/or ingredients we already have on hand that need to be used soon.
dry erase board from three by three seattle, printable dinner planner from real simple
  • Again using the planner, we write down the ingredients we need to buy for each meal in the appropriate columns to the right (Produce, Dairy & Refrigerated, etc).  I love the way the planner is organized because the columns correspond to the aisles of most grocery stores, making it easy to shop down each column.
  • So we don't forget what we decided upon for what day, we write the dishes on a dry erase board we have in the kitchen, which serves as a menu. We use the Magnetic Glass Dry Erase Weekly Planner from Three By Three Seattle.  We love it because it's conveniently labeled with the days of the week, it has a handy little shelf for a marker, and it's magnetic, so we can post up printouts of any recipes we'll be using.

Hope sharing this was helpful to anyone out there who may also struggle with dinner planning!

Washi Tape Calendar

Do like Jensie Jean of Take Two They're Small and use washi tape in different colors and patterns to beautifully mark multi-day events and projects in your planner. A nice alternative to using highlighters, doing this lets you see at a glance what you have coming up and when you'll be busiest. Great idea, wouldn't you agree?

washi-tape-organized-calendar.jpg

BTW, Russell + Hazel binders, like the ones you see above, are currently on sale on One Kings Lane through Saturday! They're beautiful and can be customized with their SmartDate system.

image credits: 1-russell + hazel, 2-pretty tape, 3- take 2 they're small

Beautifully Organized Magazines Part II

In the last 'Beautifully Organized' post I talked about organizing the latest magazine issues - the ones that are current reading material. Today I want to go over a few tips on organizing old magazine issues that you've held onto for future reference.  You may have heard the organizing rule that you should only keep the most current issue of any given magazine and toss the rest.  While that may be a good idea for many, I don't believe it's necessarily a rule all should follow.  If you're anything like me, you love your shelter and fashion glossies and like to go through old issues from time to time for a jolt of visual inspiration for a blog post, design project, etc. Oftentimes an issue from a few years ago is just as inspiring as a current one and the tactile experience of flipping through the pages is a nice break from all the digital.

Since new issues arrive to us every month from various subscriptions though, the challenge is not letting the collection get out of control.  Most of don't have space to store every single issue of every single publication.  What I like to do is, when I get a new magazine in, as I'm reading through it, I fold down the corner of pages that have inspiring content.  If I only dog-ear two or three pages, I rip those out, save them in a magazine clippings binder (more on that later!) and recycle the remainder of the magazine.   If I find that I've dog-eared tons of pages though, I keep the magazine.

Here's a few ideas on how to store the keepers:

Separate them out by type...

Place stacks of them on open shelving in the living room, bedroom, or office.  If done neatly, they can be integrated nicely into the decor of a space.

Alternatively, containerize them in magazine files a la Carrie Bradshaw...

Ikea and the Container Store are my go-to places to get magazine files.  You can either turn them around so the fully covered side is facing towards the front, and label them for a clean, streamlined look...

Or you can turn them the opposite way so that the upper half of the magazines show...It's a good idea to turn the files this side when you don't have labels on them. Bonus: Looks particularly nice when the spines are colorful!

Tell me, do you collect magazines? How do you organize and store them?

Hope this inspired some ideas for your own home!

image credits: 1- 7th house on the left 2- mimi + meg, 3- photography by danielle moss styling by alexandra berlin design, 4- scan from your home is a sanctuary via this is glamorous, 5- martha stewart, 6- canadian house and home, 7- hbo's sex and the city, 8- via lonny mag, 9- via for the love of pretty, 10- deliciously organized, 11- i heart organizing, 12- arianna belle, 13- found via this pin

How Stephanie Organizes Her Handbags

Today we have blogger Stephanie Fisher of Glitter and Goat Cheese participating in the How I Organize series. She gives us a look at how she organizes her fabulous handbags:

I have to admit - I've always been the walk-in-and-throw-everything-on-the-floor type. My poor purses used to find themselves discarded on the floor on a daily basis. But when I became the proud owner of a chew-happy puppy with a penchant for raiding my bags, I knew it was time to find a better solution.

We rent a home without many built-in hanging solutions, so we utilize these over-the-door racks in several rooms. This particular one used to hold towels in our guest bathroom, but now it hangs in my office and is the home for my most-used handbags. (As you can probably tell - I have a bit of thing for black, gold and sequins.) The office is close to the front door, so it's a quick, convenient spot to unload my purse before I head in to greet my puppy. Plus, I love that my favorite bags are on display instead of hidden in a closet!